CNC Machine Manual: A Comprehensive Guide
This manual provides detailed instructions for operating and maintaining CNC machines, specifically focusing on the Twotrees TTC450 Pro,
with a quick setup and excellent build quality.
Understanding CNC Machines
CNC (Computer Numerical Control) machines represent a revolution in manufacturing, offering precision and automation previously unattainable. These machines utilize pre-programmed computer software to dictate the movements of cutting tools.
Unlike manual machining, CNC eliminates much of the human error, resulting in consistent, repeatable results. The Twotrees TTC450 Pro, as a CNC router, exemplifies this technology,
allowing for intricate designs and efficient material removal. Mastering CNC requires understanding its core principles and the interplay between software and hardware.
Types of CNC Machines Covered in this Manual
While the principles of CNC machining are universal, various machine types cater to different needs. This manual primarily focuses on CNC routers, exemplified by the Twotrees TTC450 Pro.
Routers excel at material removal from softer materials like wood, plastics, and aluminum. Other CNC types include mills, lathes, and plasma cutters, each suited for specific applications.
Understanding these distinctions is crucial for selecting the right machine for a given project, and this guide will concentrate on router operation and maintenance.
Safety Precautions
CNC machines involve rotating parts and powerful cutting tools, demanding strict adherence to safety protocols. Always wear appropriate safety glasses to protect your eyes from flying debris. Secure loose clothing and hair to prevent entanglement.
Never reach into the machine while it’s operating. Familiarize yourself with emergency stop procedures before starting any operation. A safe working environment is paramount when utilizing CNC technology.
General Safety Rules
Prior to operation, ensure the work area is clean and well-lit. Always double-check that the workpiece is securely clamped. Never leave the machine unattended during a cutting cycle. Understand the limitations of the machine and the materials being processed.
Regularly inspect tooling for wear or damage. Maintain a clear understanding of all control panel functions and indicators.
Emergency Stop Procedures
In any unsafe situation, immediately activate the emergency stop button. This will halt all machine operations instantly. Do not attempt to restart the machine until the cause of the emergency has been identified and corrected. Ensure all moving parts have come to a complete stop before intervention.
Familiarize yourself with the location of all emergency stop buttons prior to operation.
CNC Machine Components
CNC machines consist of several key components working in harmony. These include the spindle, responsible for holding and rotating the cutting tool, and the control panel, which serves as the machine’s interface. Effective workholding systems securely clamp the workpiece during machining. Understanding each component’s function is crucial for safe and efficient operation, ensuring precision and quality results.
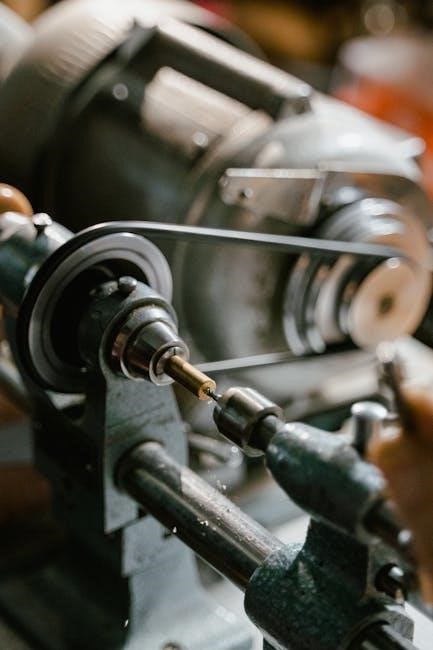
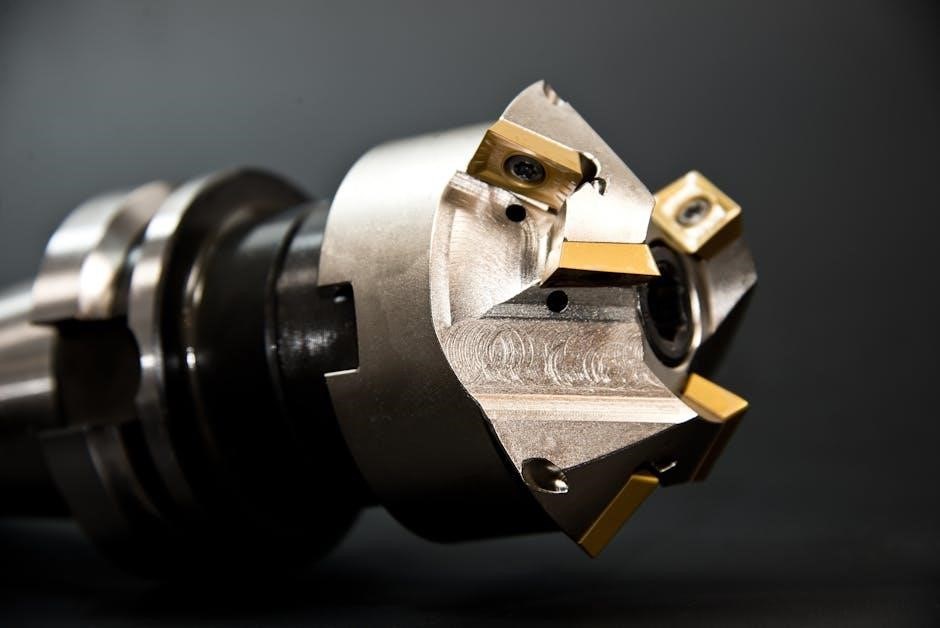
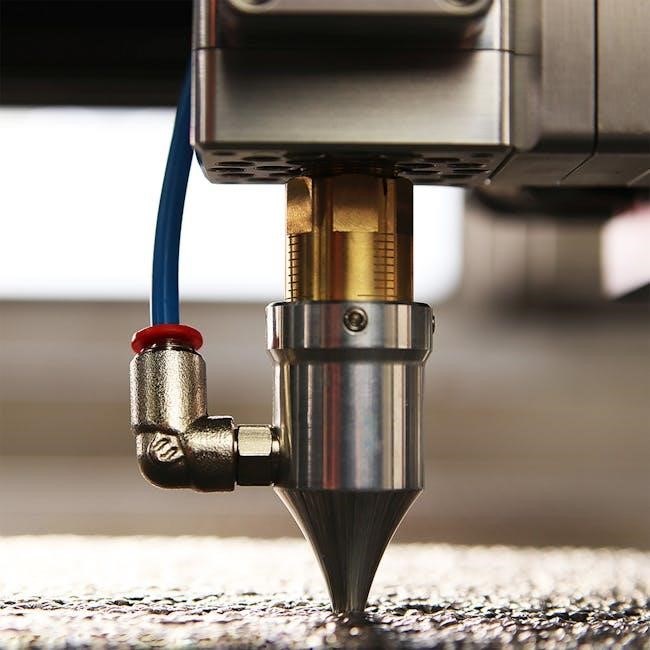
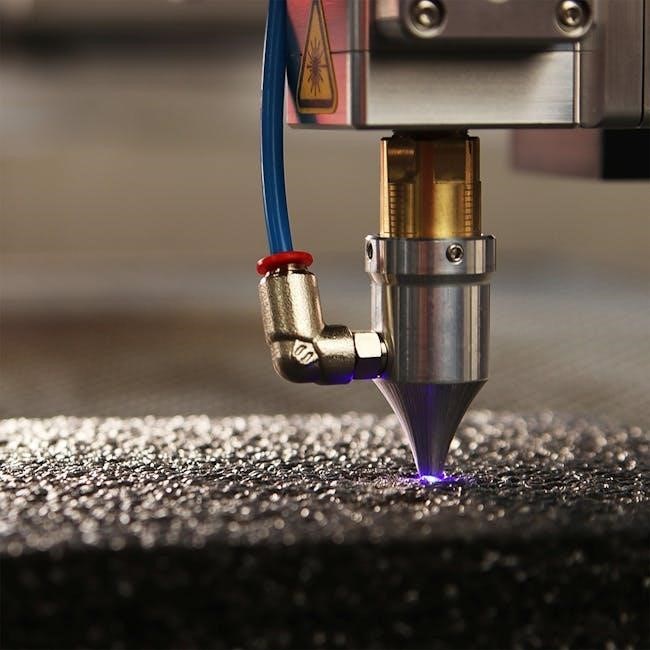
Spindle and Tooling
The spindle is the heart of the CNC machine, rotating at high speeds to drive the cutting tool. Proper tooling selection is paramount for achieving desired results, considering material and cut geometry. Securely mounting the tool within the spindle is critical for preventing runout and ensuring accuracy. Regular inspection and maintenance of both spindle and tooling are essential for optimal performance.
Control Panel and Interface
The control panel serves as the operator’s command center, facilitating program loading, speed adjustments, and machine monitoring. Understanding the interface is crucial for navigating menus and interpreting feedback. Familiarize yourself with emergency stop locations and safety overrides. Modern CNCs often feature digital displays and intuitive controls, streamlining operation and enhancing precision. Proper use ensures safe and efficient machining.
Workholding Systems
Securely holding the workpiece is paramount for accurate machining. Various workholding systems exist, including vises, clamps, and vacuum tables. Selection depends on the material, shape, and size of the part. Proper clamping prevents vibration and ensures consistent results. Always verify the workpiece is firmly secured before initiating any cutting operation. Incorrect workholding can lead to damage, injury, and compromised part quality.
Preparing for Operation
Before commencing any machining, meticulous preparation is crucial. This involves installing and configuring the necessary software, ensuring compatibility with your CNC machine. Careful tool selection and setup are essential for optimal performance and preventing damage. Consider the workpiece material’s properties – hardness, density – to determine appropriate cutting parameters. Double-check all settings and connections before initiating the program to avoid errors.
Software Installation and Configuration
Begin by downloading the appropriate CNC control software, compatible with your machine model – Twotrees TTC450 Pro requires specific settings. Follow the installation wizard carefully, accepting license agreements and choosing a suitable installation directory. Configure the software by defining machine parameters, such as travel limits and spindle speed. Test the connection to the CNC machine to ensure proper communication. Calibrate the axes for accurate movement.
Tool Selection and Setup
Choose the correct cutting tool based on the workpiece material and desired machining operation. Securely mount the tool into the spindle, ensuring proper collet size and tightening torque. Zero the tool length using a tool setter or manual probing method for accurate depth control. Verify tool runout to minimize vibration and improve surface finish. Input tool parameters – diameter, length, and type – into the CNC control software for precise toolpath calculations.
Workpiece Material Considerations
Select appropriate cutting parameters – speed, feed rate, and depth of cut – based on the workpiece material’s hardness and machinability. Ensure proper workholding to prevent movement during machining, considering material density and shape. Account for thermal expansion, especially with aluminum, to maintain dimensional accuracy. Use appropriate coolant to dissipate heat and lubricate the cutting tool. Understand material limitations to avoid tool breakage or workpiece deformation.

Basic CNC Programming
CNC programming utilizes standardized codes – G-code for geometric movements and M-code for machine functions – to instruct the machine. Understanding coordinate systems (absolute, incremental, and polar) is crucial for defining toolpaths. G-code commands control tool motion, spindle speed, and coolant flow. M-codes manage tool changes, program stops, and other auxiliary operations. Proper syntax and sequencing are essential for error-free program execution and accurate machining results.
G-Code Fundamentals
G-code is the core language for CNC machines, dictating precise tool movements. Common G-codes include G00 (rapid traverse), G01 (linear interpolation), G02/G03 (circular interpolation), and G28 (return to home). Each code initiates a specific action, requiring accurate parameters like feed rate and coordinates. Understanding these commands allows for creating complex toolpaths. Proper G-code structure ensures smooth and accurate machining, minimizing errors and maximizing efficiency.
M-Code Functions
M-codes control auxiliary machine functions, differing from G-codes which manage movement. Essential M-codes include M03 (spindle start clockwise), M05 (spindle stop), M06 (tool change), and M30 (program end). These commands manage coolant, workpiece clamping, and other vital processes. Correct M-code usage is crucial for automated operation and safety. Combining M and G-codes creates comprehensive machining programs, enabling complex operations with precision and reliability.
Coordinate Systems
CNC machines utilize coordinate systems to define tool positions. The most common is Cartesian (X, Y, Z), specifying location in three dimensions. Work coordinate systems (G54-G59) allow shifting the zero point for each workpiece. Understanding these systems is vital for accurate programming and setup. Proper coordinate definition ensures correct toolpaths and prevents collisions. Mastering coordinate systems unlocks the full potential of CNC machining, enabling precise and repeatable results;
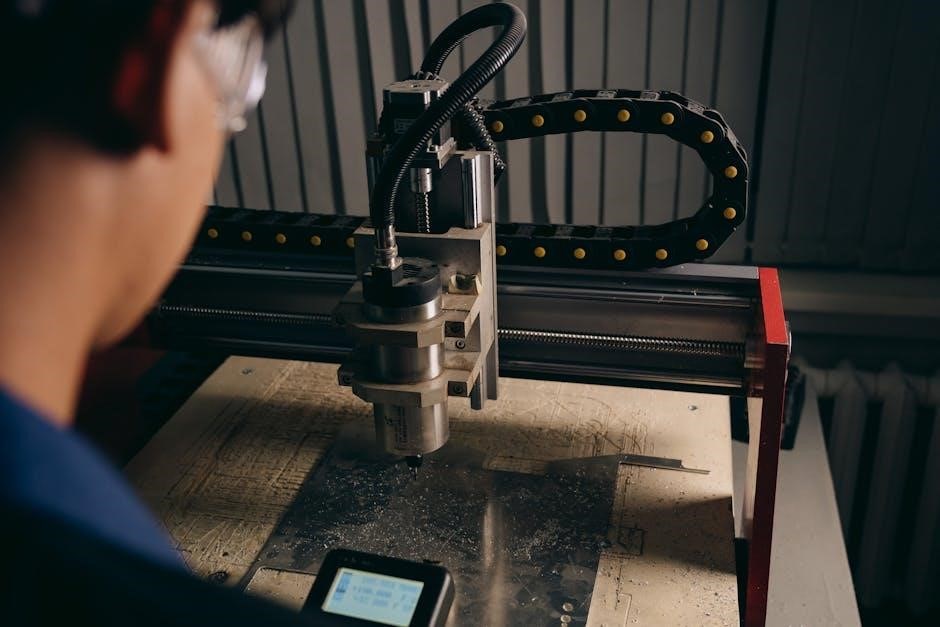
Running Your First Program
Initiating your first CNC program requires careful attention. First, load the program into the machine’s control panel. Always verify the program’s code before execution to prevent errors. Then, execute the program, closely monitoring the cutting process. Observe tool movement and listen for unusual sounds. Be prepared to make adjustments during operation if needed, utilizing the emergency stop if necessary. Successful execution builds confidence and demonstrates fundamental CNC operation.
Loading and Executing a Program
Program loading typically involves transferring the G-code file to the CNC machine’s controller via USB or network connection. Ensure the file is correctly formatted and compatible with the machine. After loading, carefully review the program on the control panel display. Initiate execution by pressing the ‘start’ or ‘cycle start’ button. Closely observe the initial movements to confirm correct operation before allowing full execution.

Monitoring the Cutting Process
Constant vigilance during operation is crucial. Observe the spindle speed, feed rates, and toolpath for any deviations from the programmed instructions. Listen for unusual noises – chattering, squealing, or grinding – which may indicate tool wear or material issues. Watch for excessive heat or smoke. Regularly check the workpiece for dimensional accuracy and surface finish, ensuring the desired results are being achieved throughout the cutting process.
Making Adjustments During Operation
Minor adjustments to feed rates or spindle speed may be necessary during a cut to optimize performance. Always pause the program before making changes, ensuring safety. Carefully observe the material removal and tool behavior after each adjustment. Document all modifications for future reference and repeatability. Avoid drastic changes, as these can compromise accuracy or damage the tool or workpiece. Prioritize small, incremental tweaks for best results.
Maintenance and Troubleshooting
Regular maintenance is crucial for optimal CNC performance and longevity. Routine tasks include cleaning, lubrication, and inspection of key components. Common issues, like tool wear or unexpected stops, require systematic troubleshooting. Consult this manual for specific solutions and diagrams. Prioritize safety during all maintenance and repair procedures. Proper lubrication prevents friction and extends the life of moving parts, ensuring smooth operation.
Routine Maintenance Tasks
Daily checks involve inspecting belts for tension and verifying lubrication points are adequately supplied. Weekly tasks include cleaning the machine bed, removing chips, and checking spindle runout. Monthly procedures encompass a thorough inspection of all components, tightening screws, and verifying coolant levels. Regularly clean dust filters to maintain optimal airflow and prevent overheating, ensuring consistent performance.
Common Problems and Solutions
Tool breakage often stems from excessive feed rates or improper tool selection; reduce speed or choose a more robust tool. Poor surface finish can indicate dull tooling or incorrect cutting parameters – sharpen or replace tools and adjust settings. Machine vibrations suggest loose components or an unstable base; tighten everything and ensure a solid foundation. Software glitches may require a restart or reinstallation.
Lubrication Guidelines
Regular lubrication is crucial for extending CNC machine lifespan and maintaining precision. Spindle bearings require frequent greasing with a lithium-based lubricant. Lead screws and ways benefit from oil application, preventing friction and wear. Always consult the machine’s specific documentation for recommended lubricant types and intervals. Avoid over-lubrication, as it attracts debris. Clean excess lubricant regularly to maintain a clean working environment.
Advanced Techniques
Mastering advanced CNC techniques unlocks greater machining capabilities. Toolpath optimization minimizes cutting time and improves surface finish. Multi-tool operations streamline complex projects, reducing setup changes. Exploring 3D machining strategies enables the creation of intricate designs. Efficiently utilizing these methods requires a strong understanding of G-code and CAM software, pushing the boundaries of your CNC machine’s potential.
Toolpath Optimization
Optimizing toolpaths is crucial for efficient CNC machining. Strategies include reducing unnecessary movements, selecting appropriate cutting depths, and utilizing trochoidal milling for faster material removal. Properly configured toolpaths minimize cutting time, reduce tool wear, and improve surface finish quality. Consider lead-in/lead-out moves and avoiding abrupt direction changes for smoother operation and extended tool life, ultimately enhancing productivity.
Multi-Tool Operations
Employing multiple tools within a single CNC program expands machining capabilities. Automatic Tool Changer (ATC) systems streamline the process, allowing seamless transitions between cutting, drilling, and finishing tools. Careful sequencing is vital; plan tool changes strategically to minimize non-cutting time. Proper tool offsets are essential for accurate machining with each tool, ensuring precision and quality in complex projects.
3D Machining Strategies
Achieving complex 3D shapes requires strategic toolpath planning. Roughing passes efficiently remove large material volumes, followed by finishing passes for precise details. Stepover control dictates the overlap between passes, influencing surface finish and machining time. Adaptive clearing adjusts feed rates based on material density. Consider tool geometry – ball nose, bull nose, and V-bits – for optimal results in sculpting intricate designs.
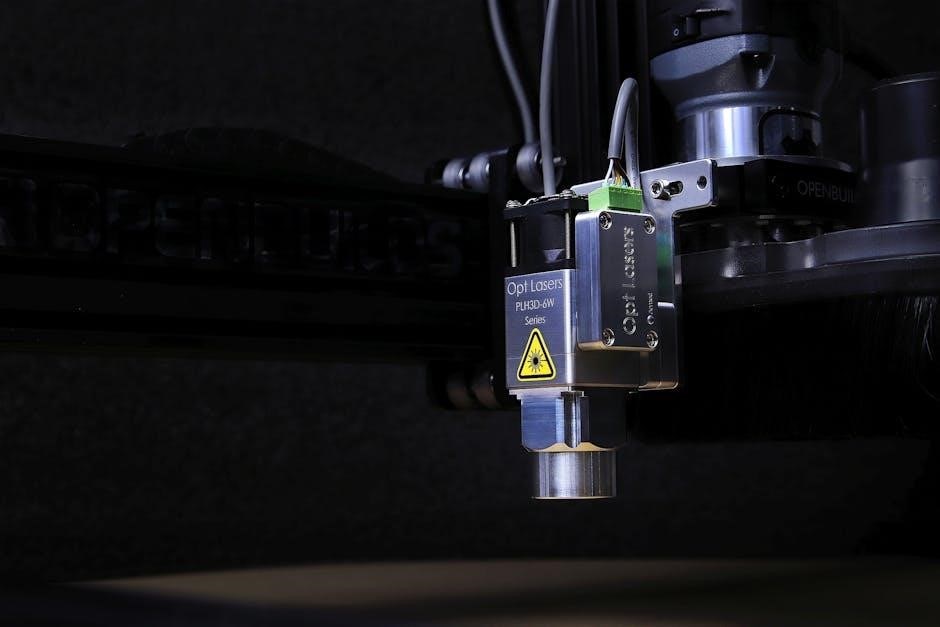
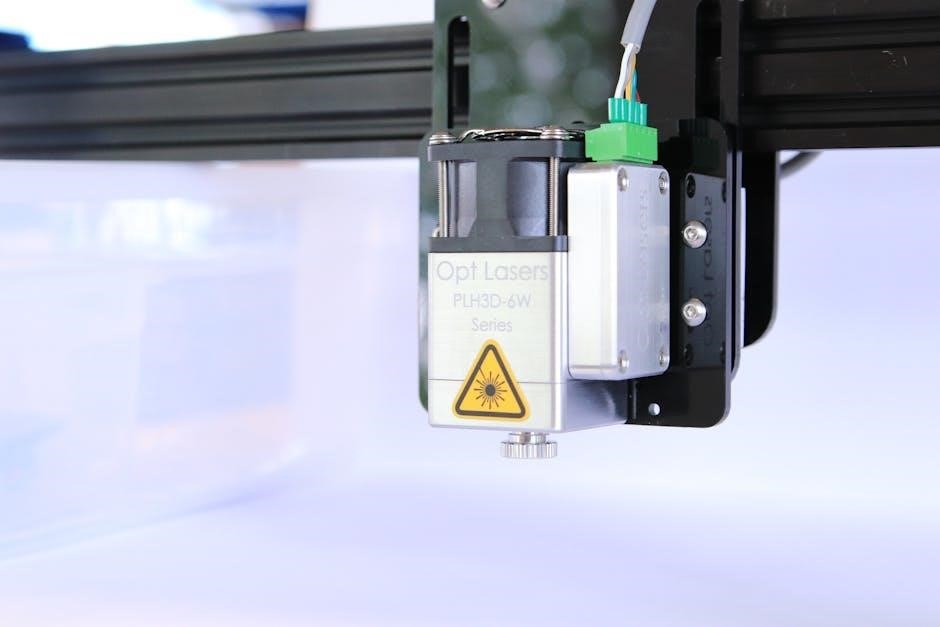
Specific Machine Model: Twotrees TTC450 Pro
The Twotrees TTC450 Pro is a popular choice for hobbyists and small workshops. It arrives partially assembled, streamlining the initial setup process. Known for its robust build quality, this model offers a balance of affordability and performance. Expect a learning curve when mastering its operation, but the results are rewarding. Specific software configurations and troubleshooting tips are detailed in the following sections.
Assembly and Initial Setup (TTC450 Pro)
Begin by carefully unpacking all components and verifying against the parts list. The TTC450 Pro arrives largely pre-assembled, simplifying the process. Focus on securely attaching remaining parts like the control box and wiring. Ensure all screws are tightened to the manufacturer’s specifications. Initial setup involves leveling the machine and performing a test run to confirm proper functionality before proceeding.
Specific Software Settings (TTC450 Pro)
Configure your chosen CNC software – such as LaserGRBL or LightBurn – to communicate with the TTC450 Pro via USB. Adjust settings for the work area dimensions to match the machine’s capabilities. Calibrate the laser power and speed based on the material being cut or engraved. Proper software configuration is crucial for achieving accurate and consistent results with this kit.
Troubleshooting (TTC450 Pro)
If the TTC450 Pro fails to connect, verify the USB cable and software settings. For inconsistent engraving, recalibrate laser power and speed. Address mechanical issues like belt tension or frame stability promptly. A steep learning curve is expected, so consult online forums and resources for common solutions. Regular maintenance prevents many problems, ensuring optimal performance.
Resources and Further Learning
Expand your CNC knowledge through online forums dedicated to the Twotrees TTC450 Pro and general CNC machining. Explore YouTube channels offering tutorials and project ideas. Consider online courses for in-depth G-code programming and CAM software mastery. Manufacturer websites provide updated software and support. Community groups offer valuable troubleshooting assistance and shared experiences, accelerating your learning journey.